
So, you want your house to sparkle, huh? Sometimes it feels like you need a whole cabinet full of fancy cleaners, but honestly, a lot of the time, you probably already have what you need. We’re talking about that simple bottle of distilled white vinegar sitting in your pantry. It’s not just for pickling cucumbers or making salad dressing; this stuff is a cleaning powerhouse. Seriously, it can tackle grease, grime, and mineral buildup all over your home. We’ll walk through how to clean with white vinegar, from your kitchen counters to your bathroom tiles, and even some tricks you might not have thought of. Let’s get your home shining!
Table of Contents
Key Takeaways
- White vinegar’s acetic acid makes it great for cutting through grease and dissolving mineral deposits like limescale.
- You can use diluted vinegar to clean stainless steel appliances, making them shine without streaks.
- Vinegar is effective for tackling bathroom issues such as limescale in showers and mold.
- Beyond general cleaning, vinegar can help remove rust from tools and even act as a natural weed killer.
- Always test vinegar on a small, hidden spot first and avoid using it on natural stone, waxed surfaces, or cast iron.
Understanding White Vinegar For Cleaning
White vinegar might seem like just another pantry staple, but it’s actually a powerhouse for cleaning. Its magic comes down to a simple chemical: acetic acid. This acid is what gives vinegar its distinctive sour taste and, more importantly for us, its cleaning abilities. When you’re looking to tackle messes around the house, understanding a bit about how vinegar works can make a big difference.
The Acetic Acid Advantage
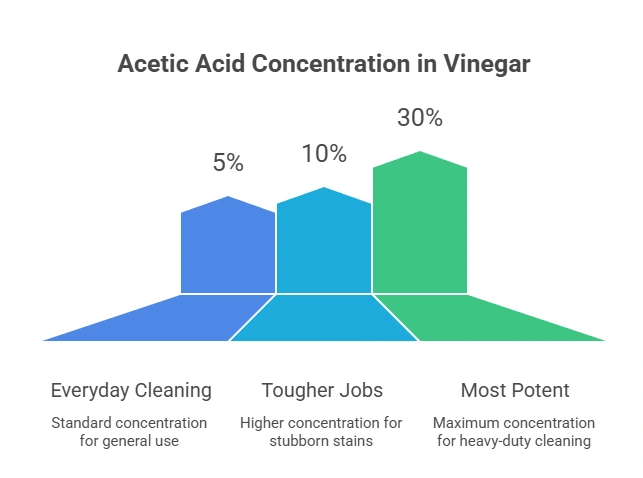
At its core, vinegar is a mixture of acetic acid and water. The concentration of acetic acid is what determines how strong its cleaning punch will be. For everyday cleaning, the standard 5% concentration you find in most grocery stores is usually enough. But for tougher jobs, you can find higher concentrations, like 10% or even 30%. The higher the percentage, the more potent the cleaning action.
This acidity is great for breaking down mineral deposits, cutting through grease, and even killing some types of bacteria and mold. It’s a natural disinfectant that doesn’t come with the harsh fumes of many commercial cleaners. It’s a pretty neat trick nature has up its sleeve, turning simple fermented liquids into a useful cleaning agent.
Essential Cleaning Tools
To get the most out of your vinegar cleaning efforts, having a few basic tools on hand will make the job much easier. You don’t need anything fancy, just the basics:
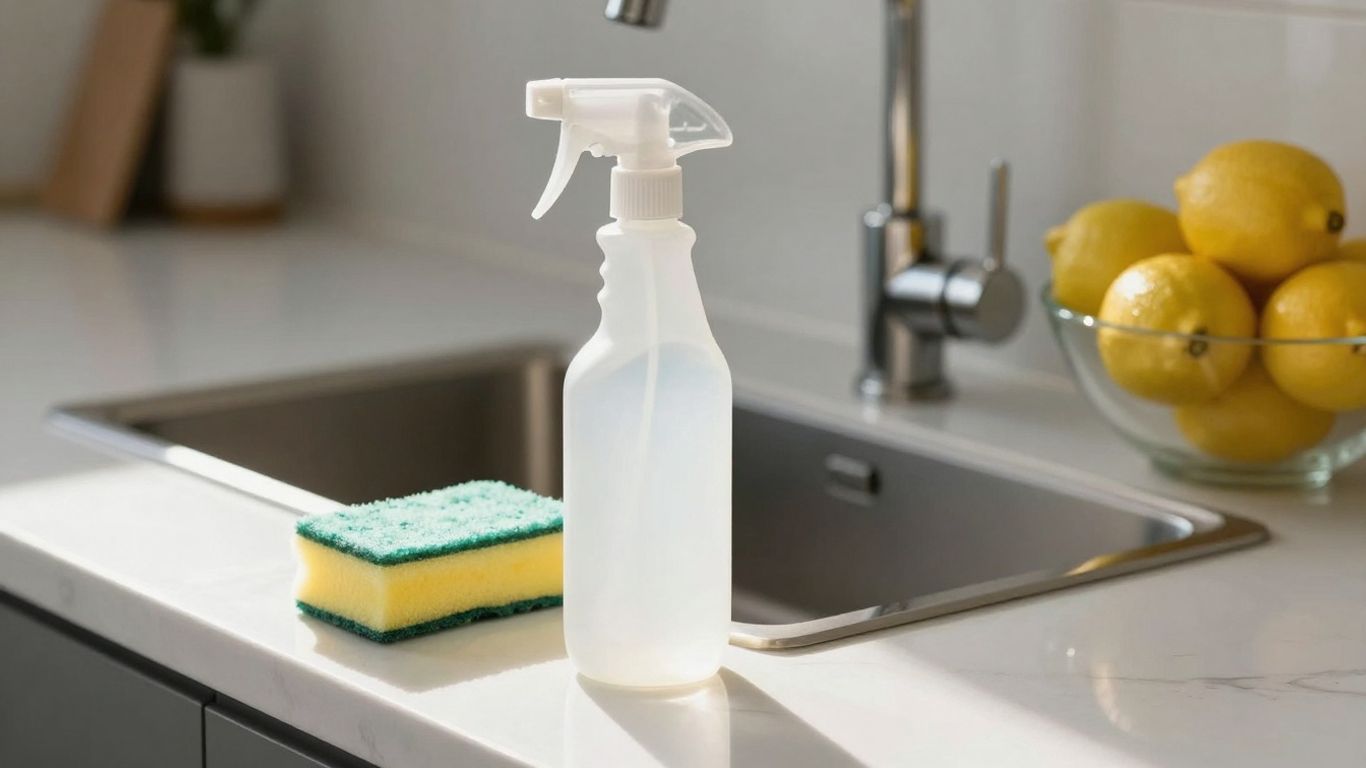
- Spray Bottle: A reusable spray bottle is perfect for applying diluted vinegar solutions evenly. Just make sure it’s clean before you fill it.
- Cotton Cloths: Old t-shirts or microfiber cloths work best. They absorb well and are less likely to leave lint behind compared to paper towels.
- Water: For most cleaning tasks, plain tap water is fine. If your tap water is very hard, using distilled water can help prevent water spots.
- Scrub Brush: For scrubbing away tougher grime, a brush with sturdy bristles can be a lifesaver.
These simple items, combined with your vinegar, form a pretty effective cleaning kit. It’s amazing how far you can get with just a few things.
Vinegar’s pH Power
Everything has a pH level, and vinegar sits on the acidic side of the scale. Most household vinegars have a pH between 2.4 and 3.0. This low pH is key to its cleaning power. Think of it like this: acidic substances are good at dissolving things that are alkaline, like soap scum and mineral deposits. The lower the pH, the stronger the acid and the more it can break down these stubborn messes. However, this acidity also means you need to be a bit careful.
While vinegar is a fantastic cleaner, its acidity means it can damage certain surfaces. Always test on a small, hidden spot first, especially on natural stone, unsealed grout, or waxed surfaces. It’s better to be safe than sorry when you’re trying out a new cleaning method.
Knowing that vinegar is acidic helps explain why it’s so effective at cutting through grime and why certain materials might not react well to it. It’s a balance between its power and how you use it.
Sparkling Kitchens With Vinegar
Your kitchen is the heart of your home, and keeping it clean can feel like a full-time job. From greasy stovetops to smudged appliances, the daily grind can leave surfaces looking less than stellar. But before you reach for those pricey, chemical-laden cleaners, consider a simple, affordable solution hiding in your pantry: white vinegar. Its natural acidity is a powerhouse for cutting through grime and leaving your kitchen gleaming.
Stainless Steel Appliance Shine
Stainless steel appliances look fantastic when they’re clean, but fingerprints and water spots seem to appear out of nowhere, right? White vinegar is your secret weapon for a streak-free shine. The acetic acid in vinegar works by breaking down mineral deposits and grease without scratching the surface. Just be sure to wipe with the grain of the steel to avoid any visible marks.
Here’s a simple method:
- Mix equal parts white vinegar and water in a spray bottle.
- Lightly mist a microfiber cloth with the solution (don’t spray directly onto the appliance, as excess liquid can seep into crevices).
- Wipe down the stainless steel surface, following the direction of the grain.
- Buff dry with a clean, dry microfiber cloth.
For an extra bit of polish and to help repel future smudges, you can follow up with a tiny amount of olive oil or baby oil on a clean cloth, buffing it in the direction of the grain.
Degreasing Ovens and Grills
Baked-on grease in your oven or on your grill can be a real pain. Commercial oven cleaners are often harsh and full of fumes. Vinegar offers a more natural approach. For light grease, a spray of diluted vinegar (1:1 with water) left to sit for a few minutes before wiping can do wonders. For tougher jobs, you might need a stronger solution or a bit more elbow grease.
Oven Cleaning Tip: For a really stubborn oven, you can create a paste of baking soda and water, apply it to the greasy areas, let it sit overnight, and then spray with vinegar. The reaction will help lift the grime, making it easier to wipe away.
Revitalizing Sinks and Countertops
Your kitchen sink and countertops see a lot of action. Vinegar can tackle water spots, soap scum, and general dullness. For most countertops (check material compatibility first!), a simple spray of diluted vinegar and a wipe-down will suffice. For sinks, especially stainless steel or porcelain, vinegar can restore their shine and help remove minor stains. Just remember to rinse thoroughly with water afterward to neutralize the acidity and prevent any lingering smell.
Always test any cleaning solution, including vinegar, on a small, inconspicuous area of your countertop first. Some natural stones, like marble or granite, can be etched by acidic substances, so it’s best to be cautious.
Bathroom Brilliance Using Vinegar
The bathroom is a prime spot for grime, soap scum, and mineral buildup. Luckily, white vinegar is a fantastic, budget-friendly ally for tackling these issues. Its acidic nature works wonders on tough deposits, leaving your bathroom sparkling.
Tackling Limescale in Showers and Kettles
Limescale, that chalky white residue, is a common nuisance in bathrooms, especially on showerheads and inside kettles. Vinegar’s acetic acid is brilliant at dissolving these mineral deposits. For showerheads, try soaking them in a bowl or plastic bag filled with undiluted white vinegar overnight. For kettles, fill the reservoir with a 1:1 mix of vinegar and water, run a cycle, then rinse thoroughly. You might need to repeat this for really stubborn buildup.
- Showerheads: Submerge in undiluted vinegar for several hours or overnight.
- Kettles: Use a 1:1 vinegar-to-water solution, run a cycle, and rinse.
- Faucets and Fixtures: Wrap a vinegar-soaked cloth around the affected area for an hour before scrubbing and rinsing.
Achieving Streak-Free Mirrors and Glass
Forget those expensive glass cleaners. A simple spray of diluted white vinegar can make your bathroom mirrors and glass shower doors gleam. Mix equal parts white vinegar and water in a spray bottle. Spray lightly onto the surface, then wipe clean with a microfiber cloth or crumpled newspaper. The key is to use a lint-free cloth for a truly streak-free finish.
Combating Mold and Mildew
Mold and mildew love damp bathroom environments. Vinegar can help kill these fungi. Spray undiluted white vinegar directly onto the affected areas, like grout lines or shower curtains. Let it sit for about an hour to penetrate, then scrub with a brush and rinse. For persistent mold, you might need a second application. Always ensure good ventilation when dealing with mold.
Remember that while vinegar is a great cleaner, it’s acidic. Always test it on a small, hidden spot first, especially on colored grout or delicate surfaces, to make sure it doesn’t cause discoloration or damage.
Beyond The Basics: Advanced Vinegar Uses
So, you’ve mastered the kitchen and bathroom with your trusty vinegar. Ready to take things up a notch? White vinegar, especially in its more concentrated forms (think 10% or even 30% acetic acid), can tackle some seriously tough jobs around your home and garden. It’s not just for wiping down counters anymore.
Rust Reduction on Tools
Got some garden tools or old wrenches looking a bit sad and rusty? Don’t toss them just yet. Soaking rusty metal items in a diluted solution of higher-strength vinegar can work wonders. A common mix is one part 30% vinegar to two parts water.
Let the item soak for a few hours, or even overnight for really stubborn rust. The acetic acid in the vinegar helps to break down the rust, making it much easier to scrub off later. Just be sure to rinse thoroughly and dry the tools completely afterward to prevent new rust from forming.
Natural Weed Eradication
Fighting weeds can feel like a never-ending battle, right? For a more natural approach, a higher concentration of vinegar (like 10% or 30%) acts as a non-selective herbicide. Spray it directly onto the leaves of weeds on a sunny day. The heat helps intensify the effect, and you’ll often see wilting within 24 hours. This is great for cracks in sidewalks or driveways where you don’t want anything growing. Just remember, it’s non-selective, so try to avoid spraying it on plants you actually want to keep!
Odor Control in Drains and Bins
That lingering smell from the kitchen drain or the trash bin? Vinegar can help. Pour about half a cup of vinegar down the drain, let it sit for about 15-30 minutes, then flush with hot water. For trash bins, a quick spray of diluted vinegar inside and out can neutralize odors. It’s a simple trick that really cuts through unpleasant smells without leaving behind a chemical scent.
Using higher concentrations of vinegar requires a bit more care. Always wear gloves and consider eye protection, especially when working with 30% solutions. Good ventilation is also key. Remember to test on a small, hidden area first if you’re unsure about how a surface will react.
Vinegar For Floor Care
Cleaning your floors with white vinegar can be a budget-friendly and effective method, but it’s important to know how to use it right, especially on different floor types. It’s a natural cleaner that can cut through grime, but its acidity means you have to be careful.
Cleaning Hardwood Floors Safely
Hardwood floors look great, but they’re also a bit sensitive. The finish on your hardwood can get damaged if you use too much vinegar or if it’s too strong. Think of it like this: you wouldn’t want to scrub your skin with pure lemon juice, right? Same idea here.
The key is dilution. Always mix vinegar with water. A common recommendation is about half a cup of white vinegar to a gallon of warm water. You also want to make sure you don’t leave the floor soaking wet. Mop it, and then maybe go over it with a dry cloth or a well-wrung-out mop to pick up any extra moisture. This helps prevent the wood from absorbing too much water, which can cause warping or damage to the finish over time.
When cleaning hardwood, always err on the side of caution. A weaker solution used more often is better than a strong one that might cause damage. It’s also a good idea to test your cleaning solution on a small, hidden spot first, like inside a closet, just to be sure.
Homemade Floor Cleaner Recipes
Making your own floor cleaner with vinegar is pretty simple. Here are a couple of ideas:
- Basic All-Purpose Floor Cleaner:
- For a Bit More Shine (Use Sparingly on Hardwood):
Remember to use distilled water if your tap water is very hard, as minerals can leave spots. And always, always use clean cloths or mop heads. A dirty mop just spreads grime around!
Important Vinegar Cleaning Precautions
White vinegar is a fantastic cleaner, really, but it’s not a miracle worker for everything. And sometimes, using it wrong can cause more problems than it solves. So, before you go splashing it around your house like you’re in a cleaning commercial, let’s talk about what you need to watch out for.
Surfaces to Avoid
While vinegar is great for many things, some materials just don’t play well with its acidity. You really don’t want to use it on:
- Natural Stone Countertops: Think granite, marble, or soapstone. The acid can etch the surface, leaving dull spots that are tough to fix.
- Unsealed Grout: Similar to stone, the acid can break down unsealed grout over time, making it crumbly and weak.
- Hardwood Floors (Undiluted or Too Often): While diluted vinegar can work on some sealed hardwoods, undiluted or frequent use can dull the finish and damage the wood itself.
- Electronic Screens: Your TV, computer monitor, or phone screen? Definitely not. The acidity can damage the anti-glare coatings.
- Cast Iron: Vinegar can strip the seasoning from cast iron pans, leading to rust.
Safe Mixing Practices
This is a big one, folks. Never, ever mix vinegar with chlorine bleach. Seriously, don’t do it. When these two get together, they create chlorine gas, which is super dangerous to breathe in and can cause serious lung damage. Also, be careful when mixing vinegar with ammonia or other strong bases. It can cause a chemical reaction that releases fumes and heat.
Here’s a quick rundown:
- Vinegar + Bleach = NO! (Toxic fumes)
- Vinegar + Ammonia = Be Cautious (Fumes and heat)
- Vinegar + Hydrogen Peroxide = Okay, but use separately (Can be used one after the other for extra cleaning power, but don’t mix them in the same bottle).
Always remember that even natural cleaners can have reactions. It’s better to be safe and use them one at a time or diluted, rather than risking a bad chemical mix. Think of it like cooking – you wouldn’t throw all the spices in at once, right?
Testing In Conspicuous Areas
Before you tackle a whole countertop or an entire shower, do a little test run. Find a small, hidden spot – maybe the back corner of your counter or the underside of a shelf. Apply your diluted vinegar solution and let it sit for a few minutes, then wipe it clean and let it dry. Check for any changes in color, texture, or finish. If everything looks good, you’re probably in the clear to clean the rest of the area. If you notice any weirdness, it’s best to stop and find a different cleaning method for that particular surface. It only takes a minute and can save you a lot of headaches later on.
Your Vinegar Cleaning Journey
So there you have it. White vinegar is pretty amazing, right? It’s not just for salad dressing anymore. We’ve seen how it can tackle tough grease on stainless steel, make your mirrors sparkle without a single streak, and even help with things like limescale in your appliances. It’s a simple ingredient, but it really gets the job done. Remember to always dilute it when needed, especially on surfaces like hardwood, and never, ever mix it with bleach. Give these tips a try around your home. You might be surprised at how much shine you can get with just a bottle of vinegar and a little bit of elbow grease.
READ ALSO: How To Clean Coffee Maker Thoroughly For The Best Brew
FAQ
Is white vinegar safe for all surfaces in my home?
White vinegar is a great cleaner, but it’s a bit acidic. That means you should avoid using it on natural stone like marble or granite, as it can etch the surface. Also, steer clear of it on waxed wood furniture or floors, and cast iron, because it can strip away protective layers.
Can I mix white vinegar with other cleaning products?
It’s super important not to mix vinegar with bleach. Doing so creates dangerous fumes that can make you sick. It’s generally best to use vinegar on its own or with simple ingredients like water or baking soda. Always test any new cleaning mix in a small, hidden spot first.
How do I get rid of tough stains or grease with vinegar?
For really stubborn spots, you can make a paste using baking soda and a little bit of white vinegar. Gently rub this paste onto the stain, let it sit for a short while, and then wipe it clean. For greasy ovens or grills, a stronger vinegar solution can help break down the baked-on mess.
Is it safe to use vinegar on my hardwood floors?
You can use vinegar on hardwood floors, but you have to be careful. Always mix it with water to make it less acidic. Don’t let the solution sit on the floor for too long, and make sure to wipe it up thoroughly. If you’re worried, there are other cleaners specifically made for hardwood floors.
How does vinegar help with limescale in my shower or kettle?
Vinegar’s acidity is fantastic at dissolving mineral buildup, like the white, crusty limescale you see in showers or kettles. You can soak the affected item in a vinegar and water mix for a while, or run a cycle with it in appliances like coffee makers, then rinse well.
What are the best tools to use when cleaning with vinegar?
You don’t need fancy supplies! Simple things like old cotton cloths or t-shirts work great for wiping. A reusable spray bottle is perfect for applying diluted vinegar. For tougher jobs, a soft brush or an old toothbrush can be helpful.